
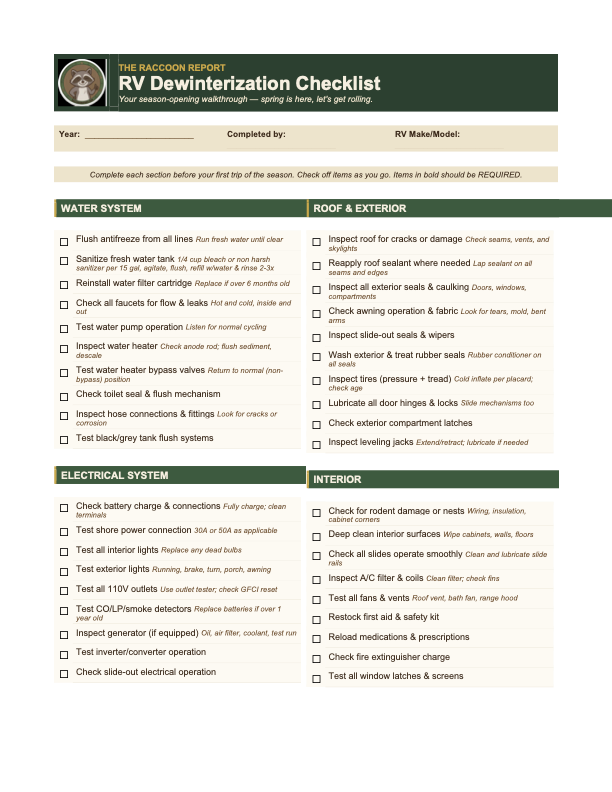
Your De-winterization Checklist
Hard Work Now = More Fun Later

As of this writing, it is May. In many parts of the United States, camping season has begun and is in full swing, while in other places that still have a bit of a chill, its on the verge of starting.
The key to the longevity of any RV is regular maintenance, and that STARTS with proper de-winterizing.
To many newbies, de-winterizing is just flushing out the antifreeze, doing a spit shine, and hitting the road. That may be ok just to get you out and into the wild outdoors, but de-winterization should be a series of tasks, not just a quick flush and flee (that line made me laugh, i’m keeping it). Proper de-winterization will ensure a longer life for your RV, and fewer disruptions during your camping season.
In this article, we’re going to go through what you SHOULD be considering at the beginning of the season to properly de-winterize your home on wheels. At the end of this article, i’ve provided a handy dandy checklist with some things you should do at the start of every season. If you are new to RV’ing, having a checklist of things you should be doing printed out is helpful until you get the hang of things and becomes muscle memory.
As always, I will state that I do not represent any RV manufacturer nor appliance brand, and suggest reading your manuals for proper maintenance guidance.
First, Book A Short and Close Trip*
*unless you store it at home with power/water/sewer access
Yup, you read that right. Book your trip. A lot of folks, me included, have to store our rig in an RV storage lot without access to power, water, or sewer, so most of what we HAVE to do, has to be done with the ability to dump waste water.
So go book your trip. Keep it within an hour of home, don’t go crazy with it. Book the largest site you can. Pull throughs typically give you more room than a back in site, and tend to be slightly more level. But if you have a favorite campground that has roomy back ins, do that instead. Whatever works better for you. You want a good amount of room to move around, lay out equipment like ladders, buckets, chemicals, etc.
I used to try to de-winterize as much as I could in storage, and then on our first trip of the season do as little as I could to get ready for the season but still allow me to enjoy the trip. But that was stressful. I’d be trying to de-winterize in storage, trying not to spill anything, moving around in tight quarters next to my class A bus neighbors. Eventually, I was given the advice of doing the full de-winterization at a campground instead, and after trying it, I won’t go back.
However, consider some campgrounds will NOT allow you to do all of your de-winterization process at their campground. As an example, not all campgrounds will allow you to wash your rig with soap and water due to the amount of water used and the chemicals. Some do. Always check, and if it’s not listed, just call the campground and asked!
Make sure to get a FULL hookup site with electric, sewer, and water. Not a dump station, you’ll want an on-site sewer hookup for the amount of water we’re about to dump. If you want to be fancy and get a site with a patio and whatnot, you do you. I do love a nice patio.
Rinse Out Your Water System BEFORE Hooking To The Camper
The most basic of the basic de-winterizing functions (hopefully), is to flush the antifreeze out of your lines.
But before we do that, we’re going to hook up to the city water, and rinse out our inlet hoses that may have sat all winter.
Turn on the campground spigot. Ensure that water runs clean. Even the campground spigot needs to prove its running clean before we hook it up to our camper. I do this EVERY trip, regardless of de-winterization or not. Helps reduce the amount of sediment you get. Sometimes if its not used in a bit, the water can be brown.
Hook up the water pressure regulator and rinse it out (keep it 50psi and below, but read your RV manuals to see what their recommended pressure is). I recommend a brass Renator Brand regulator . They last a long time, and you can adjust your pressure, instead of using a fixed pressure regulator.
Connect a new water filter & run water through it. I have been using a Camco Tastepure filter every season. Since i’m not a full timer (30-50 nights a year), I replace mine at the beginning of every season. You WILL see water come out the other end black. This is just rinsing out the charcoal in the filter. This is another task I do before hooking up my water EVERY time. SOME folks put their filter closer to the trailer, I don’t like to do that, because it adds more weight to the hose and the inlet. I try to keep the weight on the inlet as light as possible and use a hose elbow to reduce the pull.
Connect your drinking water hose to the water filter, and rinse the hose out. This rinses out any standing water that may have been trapped in your hose during the season and keeps it fresh.
Connect your drinking water hose to your rig, and then let the city water fly!
Flushing The Antifreeze
Now that you’re hooked up to city water, starting at the furthest fixture away from the city water inlet, run the water until it runs clear for the cold water first, then turn it off. Then do the same for the hot water until it runs clear, then turn it off. Then work your way backward to the city water inlet, repeating for each fixture.
DO NOT forget the following water fixtures:
The toilet
The shower head & wand (if you have both)
Exterior hoses/exterior shower (I sometimes forget these)
Your low point drains
I am pretty obsessive with flushing the antifreeze completely, so I repeat the flush process twice. There has only been one time in my now 6th season of camping that i’ve still seen pink antifreeze on the 2nd rinse, but its still a good way to ensure you’re getting it all out.
Once you are done flushing all of your lines, turn off the city water, open a fixture to draink the water, and go pull the plug on your water heater if its tankless.
This will relieve the pressure from the water heater, and allow any excess water that may have got into the lines out.
Sanitizing Your Fresh Water Tank & Plumbing
This is a step I didn’t do in my first 2 seasons because I didn’t use the fresh tank often. But once I did it, I never turned back. Early in my camping days, we only stopped at rest stops for bathroom use because I didn’t know how to properly manage my waste tanks and fresh tanks, and was afraid of having waste in the tanks while driving. After a lot of learning, we now almost exclusively use the bathroom and sinks in our rig now when we stop, and only go into the rest stop for snacks or to stretch our legs. More on that another time!
Not only does this process help sanitize your fresh tank, but it also helps sanitize your plumbing for cleaner water. Sanitizing your plumbing at the beginning of a season is a great way to not only keep your system cleaner and healthier, but you too!
We’re already using a water filter and most modern campers come with sediment screens on your inlets, water pumps, and hoses. But bacteria can build up over long periods of downtime you want to make sure is cleaned out.
This is where being hooked up to sewer is REALLY going to help, because we’re going to use a LOT of water. We’re going to be going back and forth on using and not using city water, so stick with me here. I suggest disconnecting city water when running your water pump, because your water pump should only be running when no city water is present, otherwise it can cause issues.
Choose a sanitizing liquid of your choice. Personally, I use the Camco TastePure Water System Cleaner & Deodorizer. I have known people to use highly diluted bleach instead. Personally, I won’t. I have this fear of it not being fully cleared from the lines, and one of my family drinks the water, or brushes teeth with it, and we have a potential problem.
Pour the right amount of the sanitizing liquid into your fresh water tank. The bottle will tell you how much you need to add based on the amount of gallons your fresh tank can hold. Every fresh water tank is either a gravity fill (inlet down into the tank), or fed via a wet bay/nautilus system.
If gravity fed, just measure out how much you need, and pour it in.
If not gravity fed and is a wet bay/nautilus system disconnect the city water, direct the system to redirect water to the fresh tank, and use the water pump to siphon the sanitizing liquid directly into the fresh tank.
If you used a wet bay, turn off the water pump and reconnect city water. Fill your fresh tank with city water, depending on the size of your tank, this may take a while. I have a 55 gallon tank, and this took a bit. Putting the sanitizer in FIRST, then water SECOND will agitate the solution enough to start to foam (if using the Camco solution, or something similar), and do a much more thorough job.
Once the tank is full, if you are able, it’s recommended to further agitate the tank to “wash” it further. This can be done by driving the camper around a bit, allowing the water to slosh about. Or, retracting your stabilizers, and gently rocking the camper to allow the water to slosh back and forth.
Disconnect City water, turn on the water pump. Set your wet bay to send the fresh water into your plumbing lines.
Run the agitated sanitized water through your lines. You are going to repeat the process that you did when flushing the antifreeze from your lines. Starting at the furthest water fixture from your water inlets, open the cold water for 2-3 minutes, do the same with hot water. Do this with every fixture, including the toilet, shower, and outdoor showers. You want to make sure all of your plumbing lines that run fresh water are sanitized. Repeat the process in every line until the fresh tank is empty.
Turn the water pump off. Reconnect your city water.
Fill your fresh tank again with city water only, no chemicals, disconnect city water
Repeat step 6 to run the fresh water tank water through your lines, until the tank is empty.
IF the water is now running clean, clear, and not sudsy, or smelling like bleach, without running out of fresh water, finish emptying the tank. Optionally, you can fill & flush a third and final time if you need it. The Camco solution is non toxic, but it sure as heck doesn’t taste great. So if you still have some suds, fill and flush it again.
When completed, ensure your water pump is off, city water is reconnected. Then flush the few droplets that are probably still left in your fresh tank by pulling the dump valve. Dropping a tiny bit of fresh water onto the ground won’t hurt anyone, since its clean and fresh.
De-Winterizing The Water Heater
This step really depends on what TYPE of water heater you have. You are essentially doing the same thing for both, but there are different methods for both. Note that you should NEVER run antifreeze through your tank water heater, so this is just a quick cleaning and prevention item.
Tank Based Water Heater
The tank water heaters are slightly easier to descale because you have more control over it, and don’t have to buy any crazy contraptions.
Ensure that you have not changed the bypass for your water heater, and the plumbing is still bypassing it.
Remove the drain plug, but stand aside when you do this, because whatever water that may have been left in there over the winter (hopefully none), will come out. I typically did NOT replace my drain plug when I winterized, and just put it inside the heater door, so that the tank could dry out over the winter, and no ice would form with leftover water that may have been inside. Never had a problem, but consult your manual.
In a bucket, combine a water & vinegar solution on a 1:1 ratio. For every gallon of water, a gallon of vinegar. If your trailer has sat a VERY long time and theres signs of scaling on the inlet, you can go full vinegar. I wouldn’t do that often though, it can be harsh on the tank.
Purchase a hose wand like this one from Camco. This will allow you to easily get into the water heater and spray inside to properly descale and clean, attach to a hose end.
Attach the hose to city water, and spray all throughout the inside of the water heater, you are going to try and loosen some of the scaling (if any), and just rinse out the first layer
Using the same siphoning method you used to get the antifreeze into the plumbing lines with the heater bypassed, we’re going to do the same, but switch the water heater OFF of bypass.
Siphon the water & vinegar mixture with your water pump directly into the water heater until full (or until the vinegar/water mixture is gone).
Some say it should sit overnight, some just a few hours. Check your manufacturers guidance to determine how long it should sit.
Once the solution has sat long enough, pull the plug on the water heater, and drain it.
Using your hose with the wand attachment, attached to city water, rinse out the inside of the tank once again to get the vinegar out. You may notice that as the water comes out of the heater, it may look cloudy or sandy. That is the broken down scale working its way out. Keep rinsing inside with high pressure until it runs clear.
FDEPENDING ON THE WATER HEATER you may need to use an anode rod. The dometic water heaters do not need them, but suburbans do. Again, check your manuals to determine if an Anode is recommended. If it is NOT recommended and you use one, it may rapidly deteriorate your tank! The rods in different sizes and prevent your tank from rusting. Here is an image of a bad vs good Anode rod. I typically replaced mine every season, or every other, depending how bad the water was at the campgrounds we stayed at. If needed, replace your anode rod

Bad vs Good anode rode. Credit: bestplumbersclub.com Replace the seal around the water heater plug. This is important. You need to keep a tight seal around the water heater plug, so it can build pressure to push hot water through the lines. I would typically replace the plumbers tape around the plug every season, as needed.

TANKLESS Water Heater
In the earlier instructions, you were told to remove the drain plug from the tankless water heater before flushing the antifreeze from your lines. Pretty much, thats all you need to do to drain the water. Next, you will need to descale.
Descaling for a tankless isn’t as involved as the tank based heater, but you do need special equipment like the Chromex brand tankless water heater descaler kit. The descaler kit comes with a bucket, submersible pump, chemicals, and tubing.
More or less, it’s the same process as the tank based water heater, except theres no tank to run vinegar through. Instead, the provided tubing gets hooked up to the water heater directly and runs the solution through the lines. That’s it. At least you get a bucket out of the kit, right?
Clean & Protect Your Slide Out Seals
Outside water should stay on the outside. Let me repeat that. Outside water should stay on the outside.
So let’s make sure the water stays on the outside by keeping our slide seals clean & protected.
If I learned ANYTHING from my previous travel trailer, its that I should haven taken better care of my seals. Note that there are a million solutions on the market for RV seal conditioners and lubricants. Slide seals are made by typically 1 of 2 companies, and they are not rubber! And both say they’re manufactured to be uv resistant.
Yup, you read that right. Don’t believe me? Listen to Ross from one my favorite educational youtube channels, RV Tips and Travels, talk about slide seal maintenance.
If you watched Ross, you have an idea what to do here. If you don’t, heres a few simple steps.
Get a bucket of clean water & dawn dish soap, or a spray bottle (Ross uses a pressurized bottle).
Starting at the top of your slide seals, clean top down.
Spray off the soap and water with a hose quickly. If it dries on regularly, it could damage the makeup of the seal.
Use a water based protectant (not silicone) like 303 UV protectant, spray top down, wipe it.
Inspect & Protect Your Roof
Staying in the same context of keeping the outside water outside, you also want to ensure you inspect your roof.
Hopefully, you have a walkable roof. If not, get yourself a foldable a-frame ladder like a “little giant”. You can also get a telescoping ladder, but an a-frame is stronger, sturdier, and safer, and i’ve seen telescoping ladders collapse.
Walk your roof, and inspect all of the sealant around appliances by check for cracks, or areas for water to enter. The sealant will typically crack due to uv damage, drying out, and many other reasons. There are several different sealants that you can use, and the best kind is what is recommended by your roof memberane manufacturer.
Clean the cracked area, and scrap off the cracked seal, then replace with new sealant.
For tears in the roof, again, contact the manufacturers. But it can be fixed with dicor self leveling lap sealant, as well as eternabond tape. It just needs to be cleaned, and protected from water.

Annually, you want to make sure to clean your roof and condition it, so why not do it when de-winterizing?
The proper roof conditioning depends on your roof membrane manufacturer. Again, check with your manufacturer and what conditioning solution they would recommend. This ensures your roof stays protected from UV rays and less susceptible to the elements.
Clean Your RV Inside & Out
This should go without saying, the cleaner you start the season, the easier it is to KEEP it that way for the rest of the season.
Many campgrounds will NOT allow you to wash your rig on site due to the water consumption and/or chemical usage. Some may with proper approval.
Me, I just decided to instead use a waterless wash when we de-winterized this year. It was the cleanest i’ve ever seen my trailer since we got it last season. It looks better now than it did when it left the dealership! I used the Aero Cosmetics brand waterless wash, and it came out spectacular during our season opening trip. I had help from my teenager, and it took us the better part of the day, but we got it done, and it came out great.
I would also suggest doing a full clean and condition of your tire rubber. Not a tire shine, but a legitimate deep CLEAN and condition. UV protecting your rubber will help extend the life of your tires.
Last, but definitely not least, clean your interior top to bottom. Dust, mop, vaccum, wipe, sanitize, etc.
Treat Any Signs Of Rust
Rust and water are your enemies when RV’ing. Anywhere you see rust, it needs to be treated asap, especially when it comes to towing, or your RV frame.
I am a fan of Por15. You can get an inexpensive kit that will last a while. It’s a relatively simple process, which is also detailed on the box itself.
Clean the rusty area
Use the desgreaser chemical on the clean area.
Use a fine grit sandpaper (provided) to create a rough surface for the treatment to adhere to. You do NOT have to sand off the rust.
Using the metal prep, cover the sandpapered section.
Once the metal prep solution is dried, paint the area carefully with the rust-proof paint provided.
Once the paint dries, do another coat of it. 2-3 coats should be enough.
Clean All Electronic Connections
Using something like CRC Electronic Cleaner, ensure you spray all of your electronic connections. This ensures to prevent any corrosion or buildup on your connectors and ensures they remain conductive. Connectors like:
The 5 way cable from your trailer to your tow vehicle
Your power cable that connects to the campground power to your rig
Any other power cables that are used on the exterior of your rig
Inspect & Tighten Towing Safety Items
Just like the heading says. Ensure anything that needs to be tightened, fastened, cleaned, protected, etc for towing and safe travel is done. This include tightening the lugnuts on wheels as needed, on the hitch, and on the tongue jack.
Turn On, Open, Close & Test All The Things
Every light, every fan, every appliance, every tank, every heater, every window, every door.
Make sure everything in that camper that moves is tested, and is functional.
Anything Else Is Sort Of Optional, but….
…the more you do now, the easier the season will be.
It is true! The more prep you do on your inaugural camping trip after shaking off the winter, the less you will have to do during the season, and more time you have to enjoy time in the great outdoors.
Below you will find a great and VERY detailed de-winterization checklist that hits ALL of the important points, and some that may be a bit redundant or optional. But if you are new to the RV Life, it will help you create muscle memory every season to make your seasonal rollouts more peaceful and efficient.
